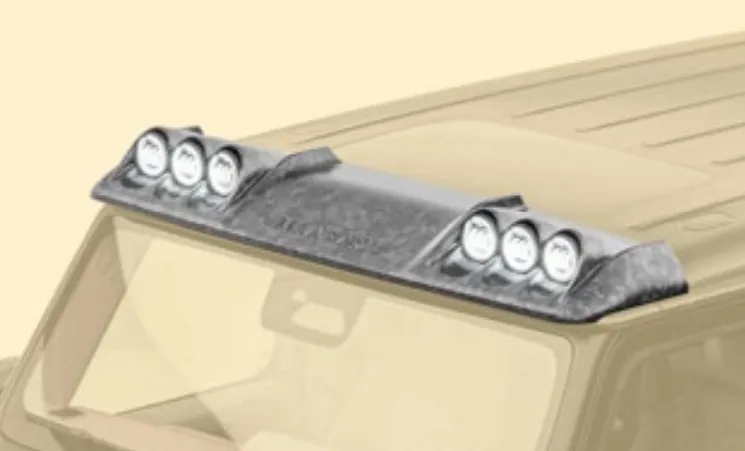
Roof panel with 6 lights


Roof Panel with 6 Lights - Maximum-Light Carbon Roof Bar for Mercedes-Benz G-Class W465 Gronos
Inside the Mansory Gronos kit for the new W465 generation G-Class there is a small family of roof-mounted carbon panels - all sharing the same front-roof footprint, all differing in light count and lamp specification. The Roof Panel with 6 Lights sits at the top of that family. It is the densest, brightest, most visually loaded configuration in the kit: a single carbon console along the front roof edge fitted with six auxiliary LED pods in a continuous bar layout. For owners who do not just want auxiliary lighting but want the entire forward roofline to read as a wall of light, this is the answer.
Identity Within the W465 Gronos Roof-Panel Family
The W465 Gronos roof-panel range is graded by light count and lamp variant. From smallest to largest:
- 2 lights - the entry configuration, twin auxiliary pods, balanced presence.
- 2 lights, GRONOS branding - same lamp count with the engraved GRONOS inscription as the central design feature.
- 2 lights Hella - twin Hella-spec position lamps with road-legal photometric profile.
- 3 lights Hella - three Hella-spec lamps for an asymmetric offset layout often used on rally and expedition builds.
- 6 lights - this product. Six pods spanning the full panel width, the max-light option in the kit.
The 6-light layout is a deliberate maximalist choice. It is for the build that is not chasing subtlety: a Gronos that wants to be seen across a hotel forecourt, a private off-road resort entrance, or in a static car-show line-up. It is also the configuration most regularly specified for vehicles intended for genuine off-road or expedition use, where six high-output forward lamps give a continuous flood-and-spot pattern that two or three pods cannot replicate.
Light Pod Specification
The six auxiliary pods supplied with the panel are Hella-spec or equivalent OEM-grade units. Hella is the reference brand for vehicle-mounted high-beam and driving lights and remains the default specification on this panel. Equivalent OEM-grade alternatives (such as Osram, Wipac or other ECE-approved units) can be substituted on request when build certification or supply availability requires it.
- Pod count: six, arrayed across the full panel width on a fixed pitch.
- Lamp size: compact circular housings, around 90 mm diameter, low projection from the panel face to keep the aero profile clean.
- Beam options at order: high-beam (long-throw driving), fog (low, wide cut-off), work-light (broad flood) or a mixed configuration (typically four high-beam + two fog).
- Total luminous output: approximately 26000-30000 lumens combined across all six pods (high-beam variant), depending on selected lamp.
- Colour temperature: 5000-5700 K white spectrum, calibrated for natural night-vision contrast rather than blue-shifted show light.
- Power draw: approximately 240-300 W combined (typically 40-50 W per pod LED with thermal headroom).
- Sealing: IP67 minimum on each housing; gasketed connectors throughout.
- Service life: 30000+ hours rated LED life on the Hella reference units.
Carbon Panel Construction and Roof Reinforcement
The panel itself is a structural component, not a cosmetic shell. The OEM W465 roof was engineered for OEM roof-rail attachment loads and a modest accessory load envelope - not for six light pods plus a continuous cantilever bar projecting forward of the windshield header. Mansory engineers the panel and its mounting interface to redistribute that load.
- Outer skin: 2x2 twill 200 g/m2 visible-carbon weave with UV-stable clear coat. Optional matte or gloss finish; raw-weave matte is the most-specified option on Gronos kits.
- Internal frame: aluminium box-section reinforcement bonded into the panel, running the full length of the lamp array. The frame transfers the cantilever moment from each lamp pod into a continuous beam rather than concentrating it at the lamp-mount points.
- Mount footprint: wider than the 2-light and 3-light variants. The 6-light uses an extended attachment line with eight primary anchor points, distributing load across the front-roof structural channel of the W465 rather than relying on the original two-bolt accessory pattern.
- Cure: autoclave-cured prepreg at 130 deg C, voids below 1% on QC sectioning.
- Mass: 6.0-7.5 kg complete - panel plus frame plus six lamp housings plus harness pre-fitted. Fully wet-out figure on a typical Gronos build.
This is materially heavier than the 2-light (3.4-3.8 kg complete) and the 3-light Hella (around 4.6 kg). The roof reinforcement is what allows the panel to carry that mass without long-term roof skin distortion or local fatigue at the anchor points.
Aerodynamic Shape and Wind Noise
Six lamp pods on the front roof edge are an aerodynamic challenge. A flat lamp array directly behind the windshield header generates pronounced wind roar at sustained motorway speeds and can introduce buffeting that resonates through the glass. Mansory addresses this with the panel shape itself rather than with add-on wind deflectors.
- Leading edge profile: the panel front edge is rounded and faired into the windshield header line, deflecting airflow up and over the lamp array rather than letting it slam directly into vertical lamp faces.
- Lamp-pod recessing: each pod sits in a shaped recess in the panel, so the housing front face is partially shielded from direct flow.
- Trailing edge: a soft chamfer sheds the airflow cleanly back over the roof skin, reducing the low-pressure zone that drives buffeting.
- Verified result: at 130 km/h the panel adds approximately 1-2 dB(A) over the OEM bare-roof baseline measured at the front-occupant ear position. A flat unfaired six-lamp array would add 6-9 dB(A) in the same conditions.
Water Drainage and Weather Sealing
A roof-mounted panel that traps water at its perimeter or around lamp housings becomes a long-term corrosion source. The 6-light panel includes drainage detail throughout:
- Recessed lamp pockets are individually drained via small channels routed under the panel and exiting at the trailing edge.
- The panel-to-roof joint is sealed with a continuous EPDM gasket and structural urethane bead, with intentional weep points at the trailing-edge corners.
- Wiring entries pass through grommeted boots into the cabin via the windshield A-pillar route (no penetrations through the painted roof skin).
- All external fasteners are stainless A4 with sealing washers.
ECE R112 High-Beam Compliance and SAE Equivalence
Auxiliary forward lamps are regulated. Under the ECE framework, high-beam-class auxiliary lamps fall under ECE R112 (or R113 for symmetric driving beams) and must be wired so that they only operate together with the main high-beam circuit - not as always-on lights, not as everyday driving lamps. Fog lamps fall under R19. Work lights are not road-approved at all.
- High-beam variant: the supplied harness includes a relay that interlocks the auxiliary array to the OEM high-beam output. Engaging the high-beam stalk activates both the main beam and the auxiliary pods. Switching to dipped beam disables the array automatically. This is the mandatory configuration for road-legal use under ECE rules.
- Fog variant: wired to the OEM front fog circuit, with cut-off pattern preserved.
- Work-light variant: dedicated dash switch only, with an interlock against vehicle road-mode (active only below a configurable speed or with the vehicle in off-road mode).
- FMVSS / SAE specification: the panel and harness are configured to FMVSS 108 conventions on request - functionally similar to ECE wiring, with auxiliary high-beam pods enabled only with main high-beam.
Each pod arrives with its E-mark or DOT marking visible on the housing, supporting registration documentation wherever the vehicle is registered.
Wiring, Relay and Switch Integration
The harness is supplied as a complete kit, terminated to the lamp pods on one side and to the vehicle distribution side ready for a trained installer to commission:
- Heavy-gauge feed from a dedicated relay panel mounted at the engine-bay distribution box, fused at the supply side.
- Relay coil triggered from the OEM high-beam wire (high-beam variant) via a low-current tap that does not load the original circuit.
- Optional CAN-bus integration module for installations where the OEM circuit cannot tolerate a passive tap; the module reads the high-beam state from the body CAN and drives the auxiliary relay accordingly.
- Optional Light Control Unit with start button on roof upgrade - a dedicated Mansory-branded control module on the roof headliner that gives a single illuminated start button for the auxiliary array, particularly suited to work-light and off-road builds.
- Cable bundle routed inside the carbon panel; only sealed boots leave the panel envelope.
Weight, Roll-Axis Effect and G-Class Handling
The G-Class is a tall body-on-frame vehicle with a high centre of gravity. Adding mass to the roof - even modest mass - moves the overall CG upward and lengthens the roll moment arm. The 6-light panel adds approximately 6-8 kg of net new mass at the highest point of the vehicle compared to the bare OEM roof. This is not a structural concern but it is a handling characteristic that the operator should be aware of:
- Body roll in fast cornering increases marginally - sub-perceptible on smooth roads, noticeable on tight switchback transitions.
- Crosswind sensitivity increases very slightly because the lamp array adds a small frontal-area projection.
- Off-road articulation and tip-over angle move conservatively - a rated 30 deg static tilt on the OEM W465 is reduced by a small fraction with a fully loaded roof.
- Weight is symmetric across the panel so handling balance is unchanged left-to-right.
For drivers stepping up from a 2-light or 3-light configuration the change is moderate. For drivers coming from an unmodified OEM roof the impression is more obvious in the first few corners, and adapts within a normal driving familiarisation period.
Comparison With the Other W465 Roof Panels
| Variant | Lights | Lamp brand | Mass | Use case |
|---|---|---|---|---|
| Roof Panel with 2 Lights | 2 | Generic OEM-grade LED | ~3.4 kg | Subtle aux lighting, urban + light off-road |
| Roof Panel Gronos with 2 Lights | 2 | Generic + GRONOS branding | ~3.6 kg | Identity-led build, brand visibility |
| Roof Panel with 2 Position Lights Hella | 2 | Hella position lamps | ~3.8 kg | Road-legal position-light layout |
| Roof Panel with 3 Position Lights Hella | 3 | Hella position lamps | ~4.6 kg | Asymmetric rally / expedition look |
| This product | 6 | Hella-spec auxiliary | 6.0-7.5 kg | Maximum forward illumination, max presence |
If you are unsure between the 3-light Hella and the 6-light, the practical filter is light count needed: under 15000 combined lumens, the 3-light is sufficient and lighter. Above that threshold, or if visual maximalism is the brief, the 6-light is the configuration to specify.
W465 Platform Note
The 6-light panel is W465-specific and is not a re-fit of a W463A part. The W465 roof bolt pattern, A-pillar grommet routing and front-roof structural channel differ from the predecessor in measurable detail. Each W465 panel is laid up against W465 master moulds and supplied with W465-specific anchor hardware. The panel will not bolt to a W463A roof without a pattern adapter, and Mansory does not supply that adapter on this product.
Installation Outline
- Vehicle inspection: confirm OEM roof condition, no prior damage, no aftermarket roof penetrations within the panel footprint.
- Wiring route survey: confirm A-pillar grommet access and engine-bay distribution clearance.
- Surface preparation: clean and degrease the panel-to-roof contact zone, mask the painted roof skin.
- Pre-fit dry: panel onto the roof, verify clearance with windshield, antenna, sunroof (where fitted) and any roof-mounted accessory.
- Apply structural urethane bead and gasket to the panel underside.
- Set the panel; secure mechanical fasteners at the eight primary anchor points.
- Route harness through the windshield A-pillar grommet into the cabin.
- Install relay panel and fuses at the engine-bay distribution box; commission high-beam tap or CAN-bus module per variant.
- Function test across all activation states (parking, dipped, high-beam, off-road switch).
- Cure 24 hours before any wash exposure or off-road use.
- Total installation time: 8-11 hours including wiring commissioning.
FAQ
Q. Is the 6-light array always on, or only with high-beam?
A. On the high-beam variant the array is interlocked with the OEM high-beam circuit and only illuminates when high-beam is selected. This is the road-legal configuration in ECE markets. Work-light and off-road-mode variants exist for builds intended for closed-course or expedition use, with their own switching logic.
Q. Can I retrofit a 6-light panel onto a Gronos that already has the 2-light or 3-light?
A. Yes, but it is a panel swap - the 2-light and 3-light versions are not upgradeable in place. The 6-light has a wider mount footprint with eight anchor points and a heavier-gauge harness, so the existing panel comes off and the new panel goes on as a complete assembly. The vehicle does not need to leave the workshop for that swap.
Q. Will the panel interfere with the OEM roof rails or any roof-rack accessory?
A. The panel sits forward of the OEM roof rail attachment line and does not occupy that footprint. Roof-rack systems mounted to the OEM rails (Thule, Mansory's own rack solutions, expedition rack systems) remain compatible. There is no clearance conflict.
Q. What is the impact on insurance and registration?
A. Auxiliary lights are usually notifiable. Because the panel is supplied with E-marked Hella-spec lamps and a high-beam-interlocked harness it is generally accepted by insurers and inspection authorities, but the operator should declare the modification and retain the supplied conformity documentation for their local registration check.
Q. Can the lamp variant be changed later (e.g. swap fog pods for high-beam pods)?
A. Yes. The pod housings are individually replaceable through the panel front face after removing the bezel rings. A pod swap takes about 20 minutes per lamp and does not require panel removal. Wiring termination is identical across the supported pod variants.
Order the Roof Panel with 6 Lights
WhatsApp +44 7488 818 747 - lamp variant selection, finish, harness configuration, fitment confirmation by VIN.
[email protected] - quote, lead-time and freight options.
Made-to-order from Mansory, typically 10-14 weeks from confirmation. Worldwide shipping with carbon-safe packaging. See the parent Mansory Body Kit for Mercedes Benz G-class W465 Gronos kit or browse the full Mansory G-Class catalogue for matching parts.