Light control unit with start button on roof


Light Control Unit with Roof-Mounted Start Button — Mercedes-Benz G-Class W465 Gronos
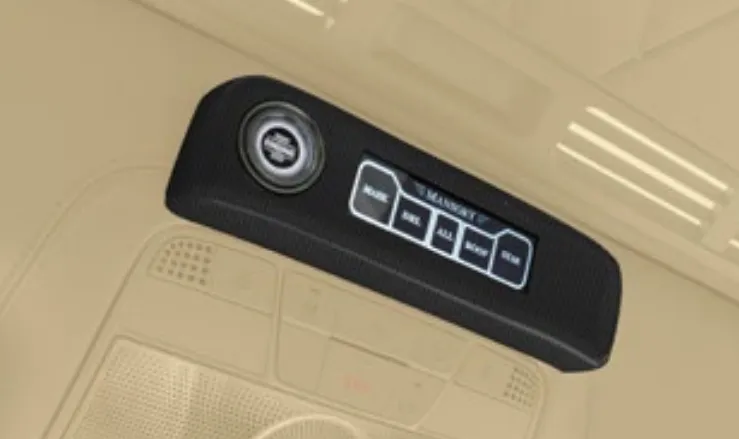
The Mansory Light Control Unit is the roof-console electrical centrepiece of the Gronos cabin upgrade for the new Mercedes-Benz G-Class W465. Where the OEM headliner offers a sparse, utilitarian set of dome-light buttons, the Mansory unit replaces that whole zone with a fully integrated overhead command pod — a carbon-clad shell that hosts a push-to-start ignition button, dimmable interior lighting, ambient-mood control and an auxiliary trigger output for owners who run roof-bar spotlights, light pods or signature LED bars on the upper bodywork. It is engineered as a deliberately understated piece: aerospace-grade materials, precise haptics, and an electrical architecture that respects the W465 CAN topology rather than fighting it.
Roof-Console Design and Driver Ergonomics
The console is shaped to the W465 headliner cut-out and sits flush with the perimeter trim, rising no more than 11 mm below the OEM headliner plane. The button cluster is offset toward the driver side by 38 mm so the start trigger and the primary light keys fall under a relaxed overhead reach — the geometry assumes a 95th-percentile driver in normal seat position can locate the start button by feel alone, with the thumb pad finding the chamfered ridge that frames the ignition key. Tactile differentiation is deliberate: the start button has a domed silicone cap with a 4.2 N actuation force and a defined click, while the light keys are flat capacitive surfaces with light haptic feedback at 60 ms. Drivers do not look up to operate the unit. The hierarchy is muscle memory.
The bezel slope is set at 14 degrees facing rearward, which keeps glare from the dome lamp out of the windshield reflection and keeps the keys visible to rear passengers without illuminating the driver's face during night driving. Side-marker LEDs along the inboard edge are independently dimmable and can be tied to the OEM ambient-lighting scene through the configuration menu.
Integrated Push-to-Start Button — CAN-Bus Pass-Through, OEM Handshake Retained
The most engineered element is the push-to-start button. It is not a parallel switch wired across the OEM ignition contact. The Mansory unit interposes a CAN-bus gateway between the keyless-go authorisation module and the ignition logic, so when the driver presses the roof button the gateway requests an ignition cycle through the same authenticated channel the OEM steering-column button uses. The factory immobiliser, the rolling-code key handshake and the OEM theft-protection topology are all preserved exactly as Mercedes specified them. No key replacement is required, no immobiliser bypass is performed, and the OEM column button continues to work in parallel — both ignition triggers route into the same authorisation event.
What this means in practice: the vehicle still demands a valid keyless-go signature. The roof button is a courtesy ignition trigger, not a workaround. If the key is absent, the button does nothing. If the key is in pocket and the brake pedal is depressed, the button starts the engine through the standard W465 ignition sequence — fuel pump priming, alternator excitation, idle-speed ramp — exactly as if the column button had been pressed. Diagnostic logging remains intact, dealer-tool fault reads are unaffected, and the OEM warranty position on the powertrain electrical system is preserved.
Light Controls — Interior Dome, Ambient Mood, Auxiliary Trigger Output
Three lighting domains are managed from the console:
- Interior dome lighting: three-stage dimming (off, half, full) for the front overhead lamp, with a separate momentary key for the rear cabin lamp. Dimming is driven through PWM at 1.6 kHz to avoid flicker on phone cameras and dashcam footage.
- Ambient cabin lighting: the unit ties into the W465 ambient-lighting CAN messages and exposes a scene-cycle key. Scenes can be customised via the Mansory configuration tool — colour temperature, intensity, zone mapping. The factory ambient-lighting menu in MBUX continues to function in parallel.
- Auxiliary trigger output: a dedicated 12V/15A switched output is brought out to a single Deutsch DT04-2P connector on the back of the console, intended for owners who run a roof light bar, A-pillar pod lights, or rock lights. The output is fused at 15A, includes reverse-polarity protection and is hold-current monitored — if a load shorts, the gateway latches off and reports a fault on the next ignition cycle.
The auxiliary output is software-gated: it can be configured to follow ignition, follow high-beam, follow a momentary key on the console, or remain locked out entirely. Owners who do not run auxiliary lighting can ignore the output completely; it draws no quiescent current when unused.
Materials — Carbon Shell, Anodised Aluminium Bezel, IP54 Sealing, PMMA Light Pipes
The console body is a single-piece moulded carbon-trim shell, autoclave-cured at 125 degrees Celsius with a 2x2 twill visible weave. The shell wall thickness is 1.4 mm at the perimeter and 2.1 mm where the button cluster mounts. The visible weave is available in gloss, matte or Mansory forged-carbon finish; the OEM headliner colour is matched on the underside flange so the transition to factory trim is invisible.
- Bezel: CNC-machined 6082-T6 aluminium with a hard-anodised matte black finish, designed as an anti-glare ring around the start button so reflected dashboard light does not bounce into the driver's eyes at night.
- Sealing: the unit is rated IP54 against dust ingress and incidental moisture — relevant for owners who run with the roof open, drive in dust environments or wash the cabin out periodically. All connector entries use grommeted cable glands.
- Light pipes: the illumination behind each key is delivered through automotive-grade PMMA light pipes with measured 80 percent transmittance at 550 nm, machined at the source end and polished at the visible end so colour temperature is uniform across the cluster.
- PCB: two-layer FR-4 with conformal coating, automotive temperature-grade components rated -40 to +105 degrees Celsius, ESD-protected on every external pin.
Fitment — Mercedes-Benz G-Class W465 Gronos Pack
The unit is engineered specifically for the new W465-generation G-Class as part of the Mansory Gronos cabin pack. It is dimensioned to the W465 headliner cut-out and uses the W465 keyless-go CAN identifiers; it will not function on the previous W463 or W463A platform without a different gateway firmware build. Both left-hand-drive and right-hand-drive cabins are supported — the offset of the start button cluster is mirrored on the RHD variant so the relationship to the driver position is preserved.
Owners specifying the unit alongside the wider Gronos pack will receive a console finish matched to the rest of the cabin trim — same weave direction, same gloss level, same thread alignment as the door cards and centre-console panels.
Installation — Plug-and-Play OEM Connector, Optional Aux Harness, No Soldering
Installation does not involve cutting OEM wiring, soldering, or splicing into the keyless-go module. The base electrical connection is a single OEM-style plug that mates directly to the W465 headliner harness at the factory ignition-button branch — Mercedes provisions this connector at the headliner level, and the Mansory unit accepts it without an adapter. The auxiliary 12V/15A output uses a separate harness that runs from the console down the A-pillar to the engine-bay fuse box; this harness is supplied with the unit and is fitted only if the owner runs auxiliary lighting.
- OEM plug interface: direct mate, no adapter, no splicing.
- Auxiliary harness (optional): supplied pre-terminated, A-pillar drop, fuse-box termination ring lugs included.
- Headliner work: the OEM headliner is partially lowered at the front, the cut-out template is placed, and the console mounts via four M4 screws into existing factory threaded inserts. No drilling.
- Calibration: on first ignition cycle the gateway learns the keyless-go signature window and writes a one-time pairing record. The procedure takes under a minute.
- Total install time: 1.5 to 2 hours for an experienced trim technician, longer if the auxiliary harness is being run.
Care and Long-Term Maintenance
The visible carbon shell and the anodised bezel are cleaned with a microfibre cloth and a small amount of isopropanol diluted to 70 percent. Avoid silicone-based dashboard sprays — they leave a residue on the capacitive keys that can cause false touches over time. Do not use ammonia-based glass cleaners on the bezel; the anodised layer is robust but ammonia accelerates surface dulling. The light pipes do not need any particular care; if the cabin is being deep-cleaned and water enters the console it drains through the IP54 weep path within a few minutes and the unit is unaffected.
Firmware is field-updatable through the same OBD-II port used by the dealer diagnostic tool, via the Mansory configuration kit. Updates are infrequent — typically tied to MBUX major releases that change ambient-lighting CAN identifiers — and are non-destructive: a failed update reverts to the prior firmware on the next ignition cycle.
Position Within the Mansory Gronos Cabin Family
Within the wider Gronos cabin pack, the Light Control Unit is the electrical anchor of the headliner. It sits above the centre console, the door-card carbon panels, the steering-wheel rework and the seat-trim package, and ties them together through the ambient-lighting scene control. Owners specifying the cabin pack as a whole get a single coherent visual environment; owners specifying the unit alone receive a self-contained roof-console upgrade that does not require any other Gronos cabin part to function. Both paths are supported.
Ordering and Lead Time
Each Light Control Unit is built to order against the customer VIN — the gateway firmware is parameterised for the specific W465 build year and option set, and the visible carbon finish is matched to the wider cabin specification at the point of order. Configuration is handled directly with the Hodoor team:
WhatsApp +44 7488 818 747 — finish selection, harness configuration, VIN-based fitment confirmation
[email protected] — full quotation, EUR pricing, freight and customs documentation
FAQ — Light Control Unit
Will the unit work with my existing Mercedes key, or do I need a new key?
Existing keys are kept. The unit interposes on the CAN bus and routes the start request through the same authorisation channel the OEM column button uses. No key replacement, no immobiliser change, no dealer reprogramming of the keyless-go module is required.
Does fitting the unit affect my Mercedes-Benz factory warranty?
The unit does not modify OEM wiring or OEM modules — it connects through the factory headliner plug provisioned by Mercedes for the OEM ignition button. Powertrain and electrical-system warranty positions on the W465 are preserved. As with any aftermarket installation, individual dealer interpretations vary; on request we provide an installation declaration suitable for warranty conversations.
How long does installation take?
An experienced trim technician completes the console fit and one-time pairing in 1.5 to 2 hours. Adding the auxiliary 12V/15A harness for roof-bar lighting adds roughly another hour, mostly for routing the harness down the A-pillar and terminating at the engine-bay fuse box.
What is the lead time from order to delivery?
Made-to-order build cycle is typically 6 to 9 weeks from confirmed VIN and finish selection, with worldwide freight on top depending on destination and freight mode. Express options exist for stocked finish combinations and are quoted on request.
Can I run a roof light bar from the auxiliary output without an external relay?
Yes, up to 15 amps continuous. The output is internally relayed and fused, with reverse-polarity and over-current protection. For loads above 15 amps an external slave relay is required — the auxiliary output then drives the relay coil rather than the load directly.