Add on parts for front bumper - low side flaps Mansory Carbon for Mercedes-Benz AMG GT S Coupe


Mansory Carbon Add-On Parts for Front Bumper — LOW Side Flaps — Mercedes-AMG GT S Coupé (C190)
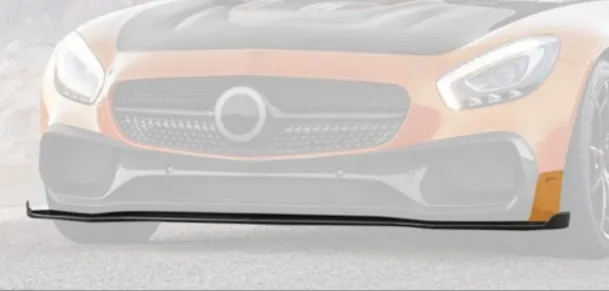
This is the LOW side-flap variant of Mansory's three-part front-bumper accent matrix for the Mercedes-AMG GT (C190) — the front-mid-engine V8 BiTurbo coupé built around the M178 4.0-litre hot-V engine and the rear-mounted SPEEDSHIFT DCT 7G transaxle. The piece is part of the broader Mansory Carbon Fiber Body kit set for Mercedes-Benz AMG GT S Coupe, and within that programme it sits at the bottom corners of the front bumper, just outboard of the splitter line. Where the high-flap variant pulls the eye outward to broaden the visual width, this LOW-flap layout drops the visual centre of mass — extending the splitter flank low to the road for a stance that reads closer to GT3 than to grand-tourer. Owners who want the long-bonnet C190 to crouch over its front axle without committing to the full wide-body kit specify this piece first.
Construction & Materials
The LOW side-flap pair is laid up in autoclave-cured prepreg carbon. The visible face uses 3K twill weave aligned to the natural diagonal of the bumper corner, so the weave reads continuously into the front-lip and front-fender-splitter-cover when those are also fitted. The structural laminate behind the cosmetic ply runs 2K plain weave for resin saturation and edge stability, because the low corners take the worst of the gravel and tar on a fast B-road or pit-lane entry.
- Cosmetic ply: 3K twill, weave aligned to bumper corner diagonal
- Structural laminate: 2K plain weave prepreg, autoclave-cured
- Wall thickness: ~2.0–2.4 mm at the flap leading edge, tapering to ~1.6 mm at the trailing tab
- Pair weight: ~0.9–1.1 kg net of mounting hardware
- Mounting hardware: stainless M5 captive nuts on a moulded tab, 3M VHB structural tape backing for full bond
- Finish standard: deep-gloss UV-stabilised lacquer over exposed weave
- Finish optional: satin or matte clear, or paint-to-body in any AMG factory or Mansory bespoke colour
- Reinforced leading edge with extra resin pass to resist stone-chip on the lowest exposed lip
Design & Visual Function
Low-side flaps are the bumper accent that talks to the road. They sit at the bottom outer corners of the OEM front bumper, extending the splitter flank rearward and slightly outboard, so the eye reads the lower edge of the car as a single continuous line from the front-lip through the splitter cheek and into the front-fender splitter cover. Visually the C190's nose appears to sit lower over the front axle, even though ride height is unchanged — it is a stance trick, not a suspension change.
Aerodynamically the flaps work as small turning vanes at the front-corner air interface. They tidy the air bleeding off the splitter edge before it reaches the front wheel arch, which on the AMG GT is where front-tyre wash creates the most drag. The benefit is modest at road speed and meaningful only at sustained high speed; the engineering vocabulary is honest about that — these are presentation parts with a positive flow-attachment side effect, not a downforce upgrade. The car's serious aero work still sits at the rear wing and the GT R AIRPANEL underbody panels.
Visually the LOW flaps harmonise best with a fitted front-lip and front-fender-splitter-cover. Specified together, the three parts read as a continuous splitter plane wrapping the front of the car. Specified alone, the LOW flaps still pay off on a stock-bumpered GT or GT S because they are the only part that visually drops the corner shadow.
Compatibility & Fitment
Designed for the Mercedes-AMG GT (C190) family — GT, GT S, GT C, GT R, GT R Pro and Black Series. Coupé fitment is the primary target; Roadster fitment requires installer confirmation because the lower bumper apron geometry differs slightly on the open car. The flaps mount to the OEM bumper without modifying the bumper substrate and without affecting OEM parking sensors, headlight washer apertures or AIRPANEL underbody aero on the GT R. They are NOT compatible with the 4-door AMG GT 63 (X290) — that car is a different platform with a different front-bumper architecture and a separate Mansory programme. Pre-facelift cars (2014–2017) with the Diamond grille still fit the LOW-flap pair correctly, because the flap geometry is bumper-corner-driven and grille-independent — the Panamericana-only fitment caveat applies to grille-mask parts, not to this piece.
Installation & Reversibility
Installation runs roughly 90 minutes to 2.5 hours per pair on a clean bumper, with the time budget set by the prep rather than the bond. The bumper corners need degreasing and a panel-wipe pass before the 3M VHB tape is committed; once committed the tape pull is permanent on its first set. Captive M5 fasteners on the moulded tab give a mechanical anchor in addition to the bond, so the piece survives jet-wash pressure and a low scrape without delamination. Reversibility is partial: the part can be removed cleanly and the OEM bumper underneath is undamaged, but the VHB residue requires a heat-gun and adhesive-remover pass to clean. We recommend an AMG-certified body shop or a Mansory-trained installer for first fit; experienced owners do specify this part DIY because the low corners are accessible without dropping the bumper.
Pairing within the Mansory AMG GT programme
The most natural pairings for the LOW side-flap variant are the front lip and the front-fender splitter cover, which together complete the lower splitter plane: Front lip and Front fender splitter cover. Owners who want to compare the bumper-accent options before committing should also look at the alternative high-flap variant: Add-on parts for front bumper, high side flaps — that piece sits higher on the bumper and pulls the eye outward instead of downward, which is the explicit visual contrast between the two variants. The base accent panel without flaps lives at Add-on parts for front bumper.
Maintenance & Durability
Lacquered carbon at front-corner height takes the worst hand the road can deal — gravel, salt spray, tar and the occasional kerb scrape on a sharp pit-lane entry. Care routine is conservative: pH-neutral shampoo only, no alkaline traffic-film removers, no ammonia-based glass cleaner overspray, no stiff-bristle brush. A ceramic coating rated for clear-coat over carbon adds two to three years of UV stability and reduces tar adhesion at the leading edge; carnauba is fine on a show car but offers no real protection here. Paint-protection film over the leading 30–40 mm of the flap is the single most useful upgrade for owners who actually drive — it absorbs stone-chip energy before it reaches the lacquer. If a flap is chipped through the lacquer to the weave, the repair is a sand-back, re-resin and re-clear pass at a carbon-trained body shop; full replacement is rarely needed because the cosmetic ply protects the structural laminate underneath. Low-speed scrape risk is real and worth flagging — this is a bottom-corner part on a low car, so steep driveways, kerbed apex stones and unpainted speed-bumps will find it before they find the splitter.
Lead Time & Warranty
Production runs on Mansory's bespoke schedule, typically four to eight weeks from order confirmation. Each pair carries a 12-month warranty against manufacturing and bonding defects; impact damage from road use is not covered, which is the standard line for any visible carbon part at bumper height.
FAQ
Q: What is the difference between the LOW side-flap, the high side-flap and the base front-bumper add-on?
A: All three sit on the OEM front bumper, but they target different visual axes. LOW flaps drop the corner shadow and lengthen the splitter flank — the car reads as if it is crouched lower. HIGH flaps sit further up the bumper face and pull the eye outward, broadening the visual width. The base add-on is a centre accent panel without flaps at all — pure carbon-weave detail without any geometry change. Pick LOW for stance, HIGH for width, base for restraint.
Q: Will the LOW flaps fit a GT R or a Black Series?
A: Yes. The LOW-flap geometry is shared across GT, GT S, GT C, GT R, GT R Pro and Black Series Coupé. On the Black Series the OEM bumper already carries more aggressive aero, and the LOW flaps integrate cleanly with that bumper's lower lip — installer should confirm flap leading-edge clearance against the Black Series splitter on first fit.
Q: Do the flaps fit the Roadster?
A: Coupé is the primary target. Roadster fitment is generally workable but the lower bumper apron geometry differs slightly between body styles, so we ask the installer to confirm flap-to-apron clearance during dry-fit before committing the VHB tape.
Q: Are these legal for road use?
A: The flaps add no significant projection beyond the OEM bumper line, so road-legality is generally not affected in markets that allow visible-carbon cosmetic add-ons. Specific regulatory advice depends on the registration country and is the owner's responsibility.
Q: What is the realistic scrape risk on driveways and speed-bumps?
A: The LOW flaps are bottom-corner parts on a low car. A factory C190 with stock ride height clears most modern speed-bumps, but steep driveways, kerbed apex stones and unpainted humps will scrape — that is the trade-off for the lowered visual stance. PPF on the leading 30–40 mm absorbs the worst of it; the flaps themselves can survive a glancing scrape thanks to the reinforced resin edge, but a hard square hit will chip the lacquer and may chip the cosmetic ply.
Q: Can I mix LOW flaps on one side and HIGH flaps on the other?
A: Don't. The two variants live on different planes of the bumper and a mixed install reads as a mistake from any angle. Pick one geometry and run it as a pair.
Q: Raw weave or lacquered finish?
A: Lacquered is standard and is the right answer for a road car at corner height — the lacquer is the UV barrier and the chip-energy absorber. Raw weave with UV-clear is available on request for an exposed-carbon track look but should be paired with PPF on the leading edge from day one.
Pair the LOW side-flap pair with the front lip and front-fender-splitter-cover for a complete lower-splitter plane on the C190 nose, or contrast it against the high-side-flap variant if you want to compare presentations on the same car. To order, confirm fitment for your VIN, or request a paint-to-body finish, contact us via WhatsApp +44 7488 818 747 or [email protected].